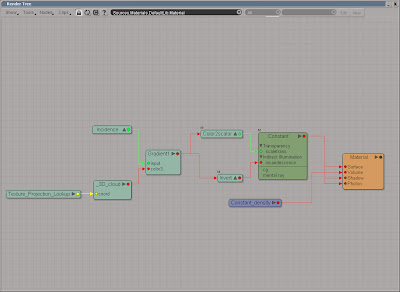
 Using a 3d texture, such as the cloud texture, adds the so important irregularity to the material and ensures that it will line-up perfectly on all three axis.
Röntgen ray, or X-ray as it’s commonly known as, is a form of electromagnetic radiation. Its short wavelengths are capable of penetrating the soft tissue as well as the bones in the human body, which has made it very useable in the modern medical services. Nevertheless, the number one use of X-ray is probably in science fiction TV shows and 3d animation.
Start by open the scene xray.scn from this issues DVD. Select one of the vertebras and press [7] to open a Render Tree (they already have a constant shader applied). The first task is to make the objects transparent. For this you’ll need Gradient (Nodes > Mixers) to control the objects opacity, an Incidence (Nodes > Illumination) to control the mapping of the gradient and a Cloud texture (Nodes > Texture Generators) to brake up the uniformity. Open the gradient PPG and click the Black/White Preset button to clear the gradient and then add a new color marker approximately in the middle of the slider. Close the PPG and connect the Incidence to the input of the Gradient node and the Gradient to the scaletrans input of the Constant node.
From the Nodes > Texture Space Generators menu choose Projection. Connect the Projection node to the coord input of the 3D_cloud and the 3D_cloud to the color3 input of the Gradient node. Open the Projection PPG. Click the New button and choose Spatial. In the UV Remap section, change the Maximum on all three axis to 3 and close the PPG. Open the 3D_cloud PPG and set the Color 2 to black and lower the Contrast to 0.5.
From the Nodes > Image Processing menu, get an Invert node. Connect the Gradient to the input of the Invert node and the Invert node to the incandescence input of the Constant node. Open the Constant PPG and set the Color to a green color such as, R:0.4, G: 0.6, B: 0.4. Switch to the Transparency tab and set the transparency color to R:0.9, G: 0.9, B: 0.9. Switch to the Indirect Illumination tab and set the Incandescence Intensity to 0.3.
From the Nodes > Volume menu, get a Constant Density node, connect it the Volume input of the Material Node and open its PPG. Change the Transmit color to black and set the Unit Scale to 1:1.
 The transparency can be modified with the Incidence node or the gradient node as well as the color sliders in the Constant shader. This ought to be enough for all your x-ray needs.
Quick tip
To see the effect of a specific node you can temporary connect it directly to the Surface input of the material node. Just don’t forget to reconnect the right node when you’re done.


3 comments:
Impresive :D Thanks alot!
Many thanks!
cheers
great tutorial, thanks from Argentina (southamerica)
Marco
Post a Comment